Tutorials
RMF Tool Step by Step Walkthrough
Last Updated: 📅 04 April 2025
Table of Contents
1. Introduction to RMF Tool
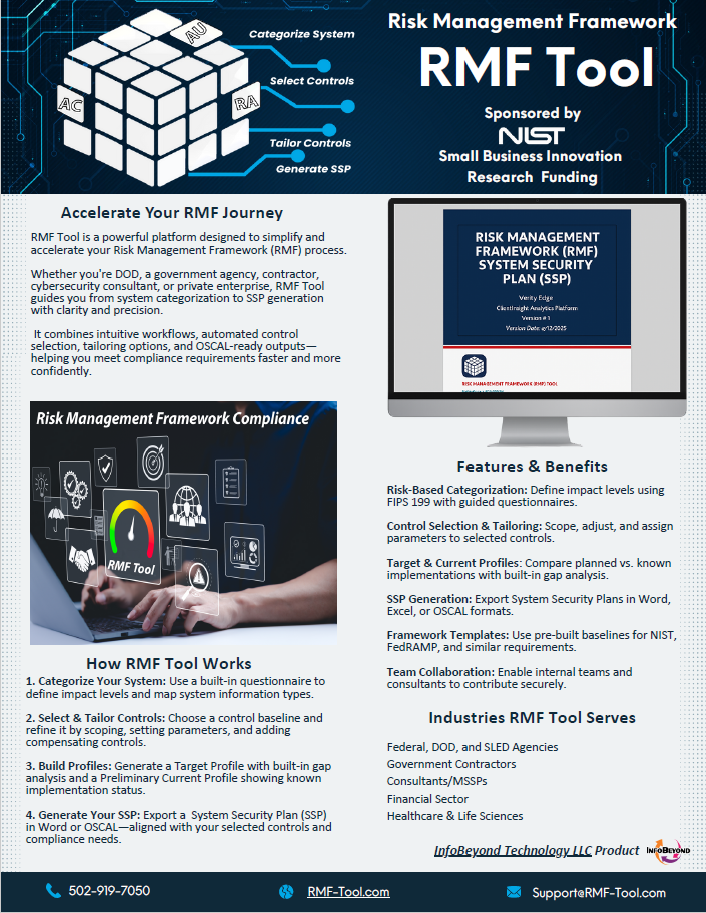
RMF Tool is a web-based platform designed to simplify and automate compliance with the NIST Risk Management Framework (RMF). Whether you are a federal contractor, cybersecurity consultant, managed security service provider (MSSP), or private enterprise, RMF Tool enables you to efficiently manage key compliance activities—such as system categorization, security control selection and tailoring, and System Security Plan (SSP) generation.
Developed under NIST funding, RMF Tool aligns with key frameworks including NIST SP 800-37, SP 800-53 Rev. 5, FIPS 199, and FedRAMP. The platform reduces manual documentation, improves collaboration across teams, and accelerates readiness for audits or security assessments.
This user guide provides step-by-step instructions for using RMF Tool’s features, including interactive questionnaires, automated SSP exports, and multi-user project management—helping your organization stay secure, compliant, and audit-ready.
2. Getting Started

Your admin account and organization profile will be created by an RMF Tool onboarding specialist, including a temporary password for initial login. Once your account is set up, you’ll receive an email to verify your address and welcome you onto the RMF Tool platform. From there, you can log in for the first time using the temporary password provided, and you’ll be prompted to set a new password of your choice.
Once logged in, you’ll have access to your organization dashboard, where you can update details such as your organization’s name, description, and contact information. You can also manage team members by inviting new users, activating or suspending accounts, and removing access—all of which can be done at any time. For more on team management, see section 4. Assigning Roles and Team Members.
3. Creating and Managing Projects
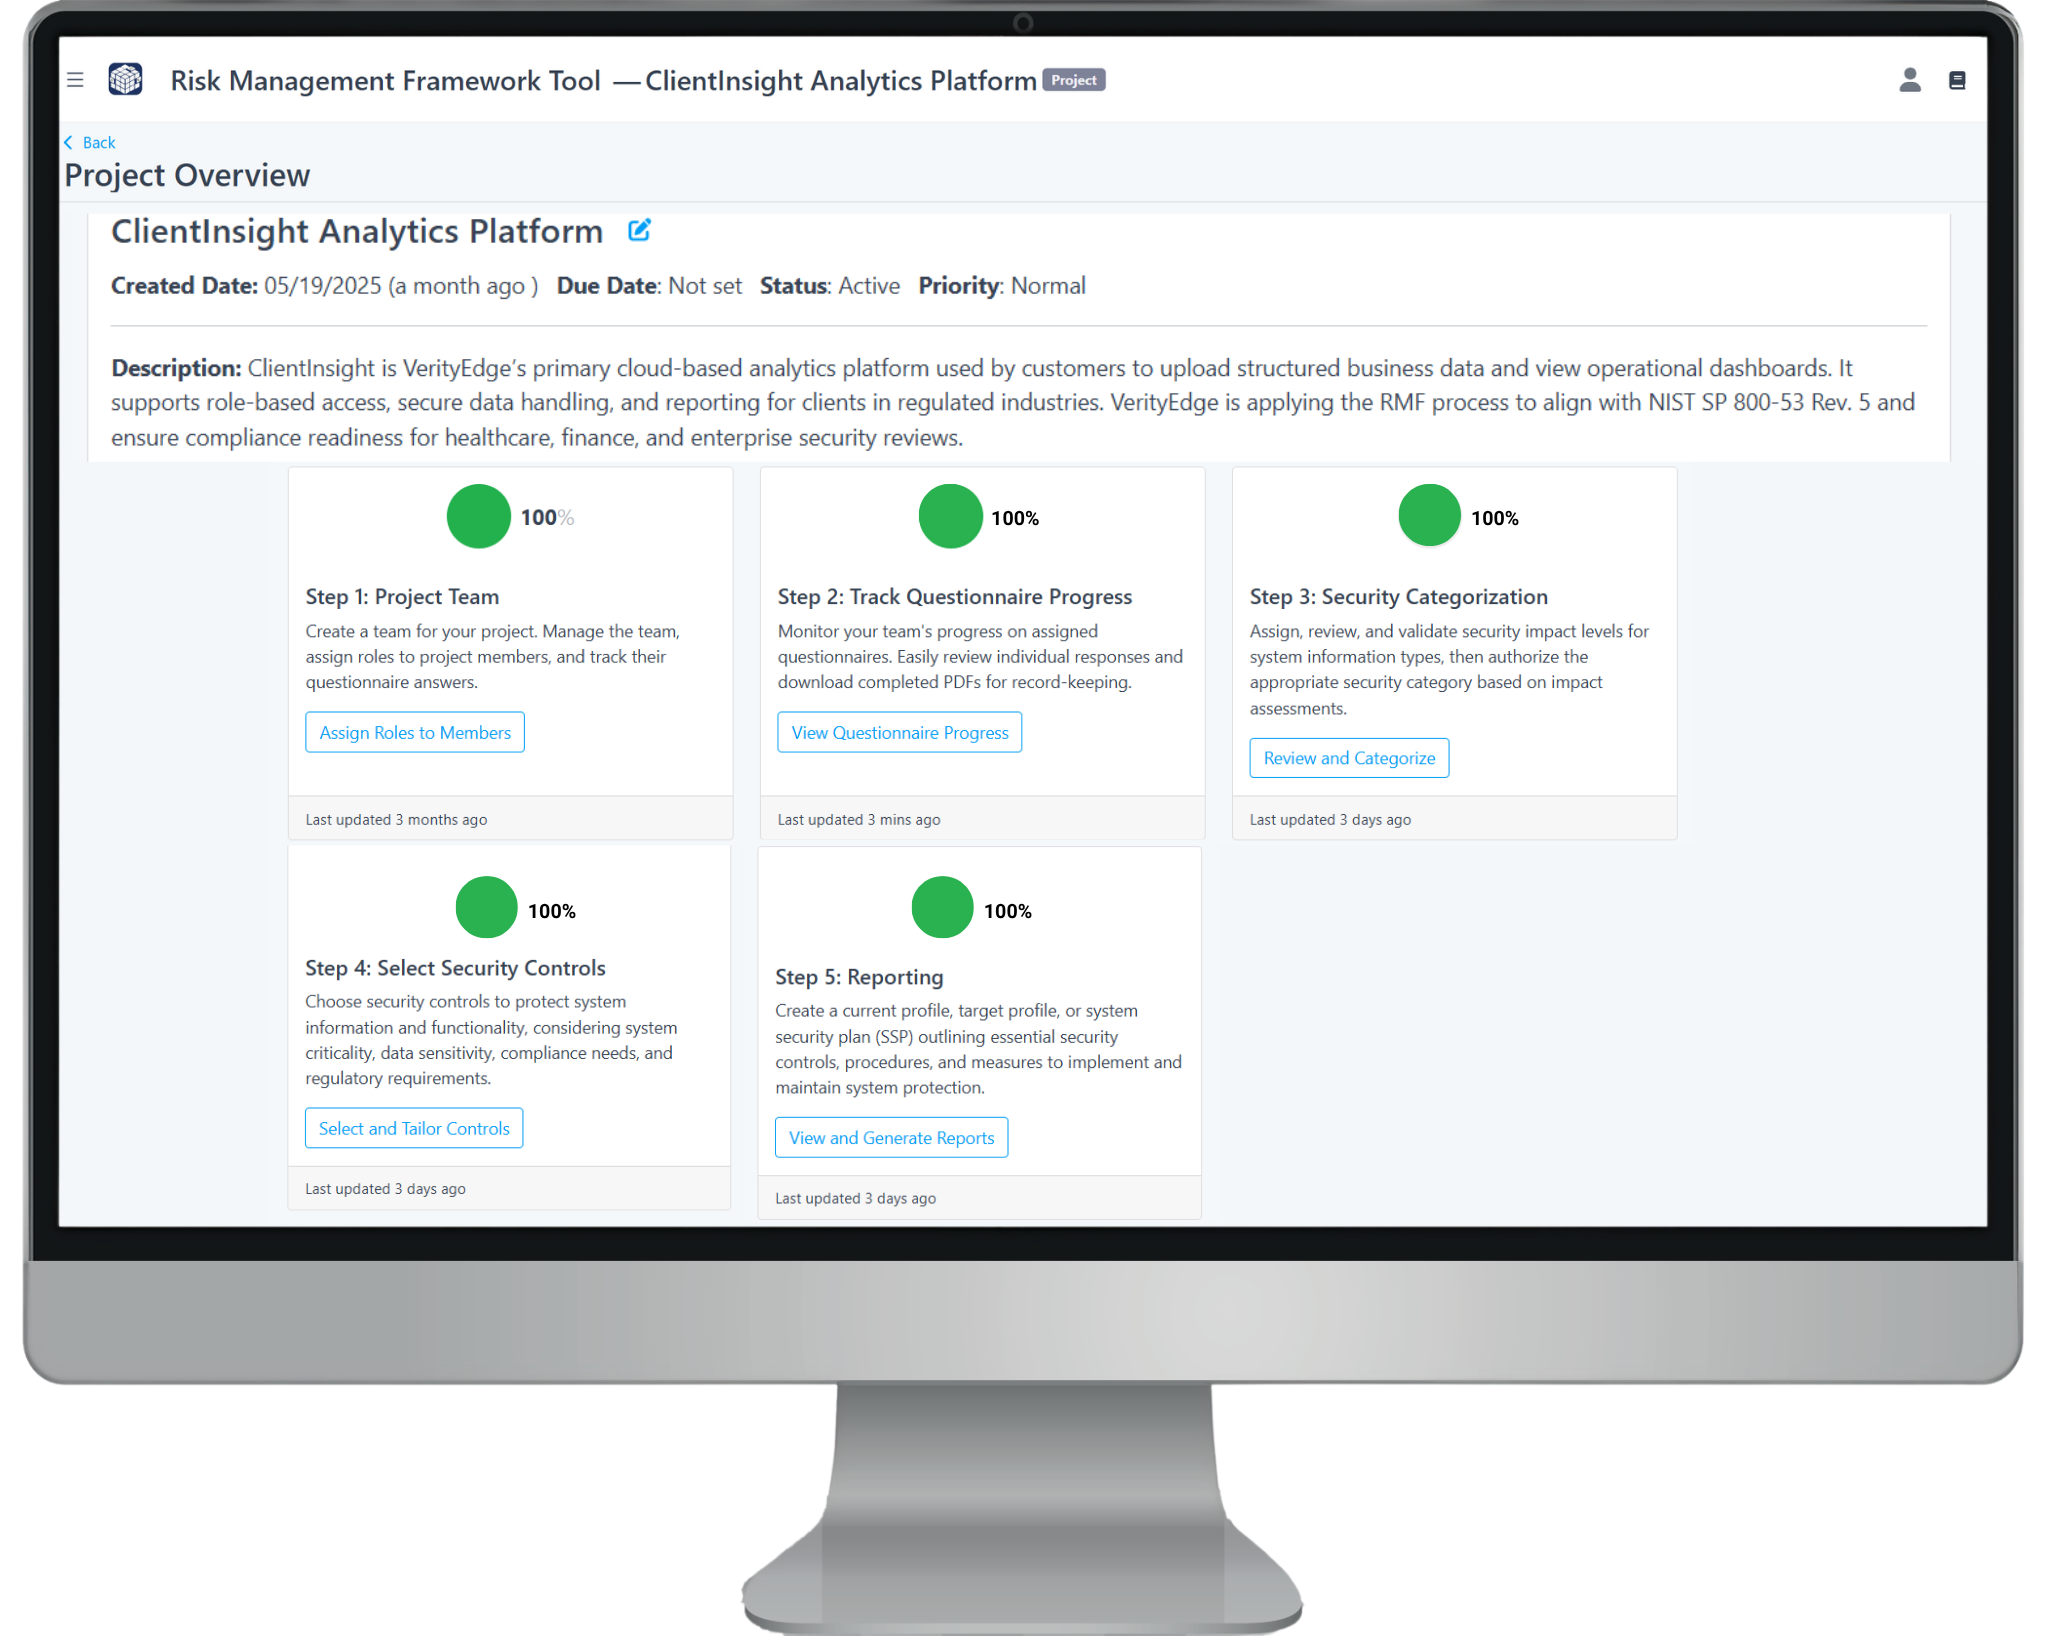
Once your organization profile is updated, you can begin creating new projects by clicking the blue “Create Project” button under the Risk Management Framework (RMF) Projects section and confirming your selection. You'll be prompted to enter key system details—such as the project name, description, keywords, priority, and due date—to establish a foundation for managing security and privacy risks. After submission, you’ll be directed to the project dashboard for that specific system, where you can begin the RMF process.
4. Assigning Roles and Team Members
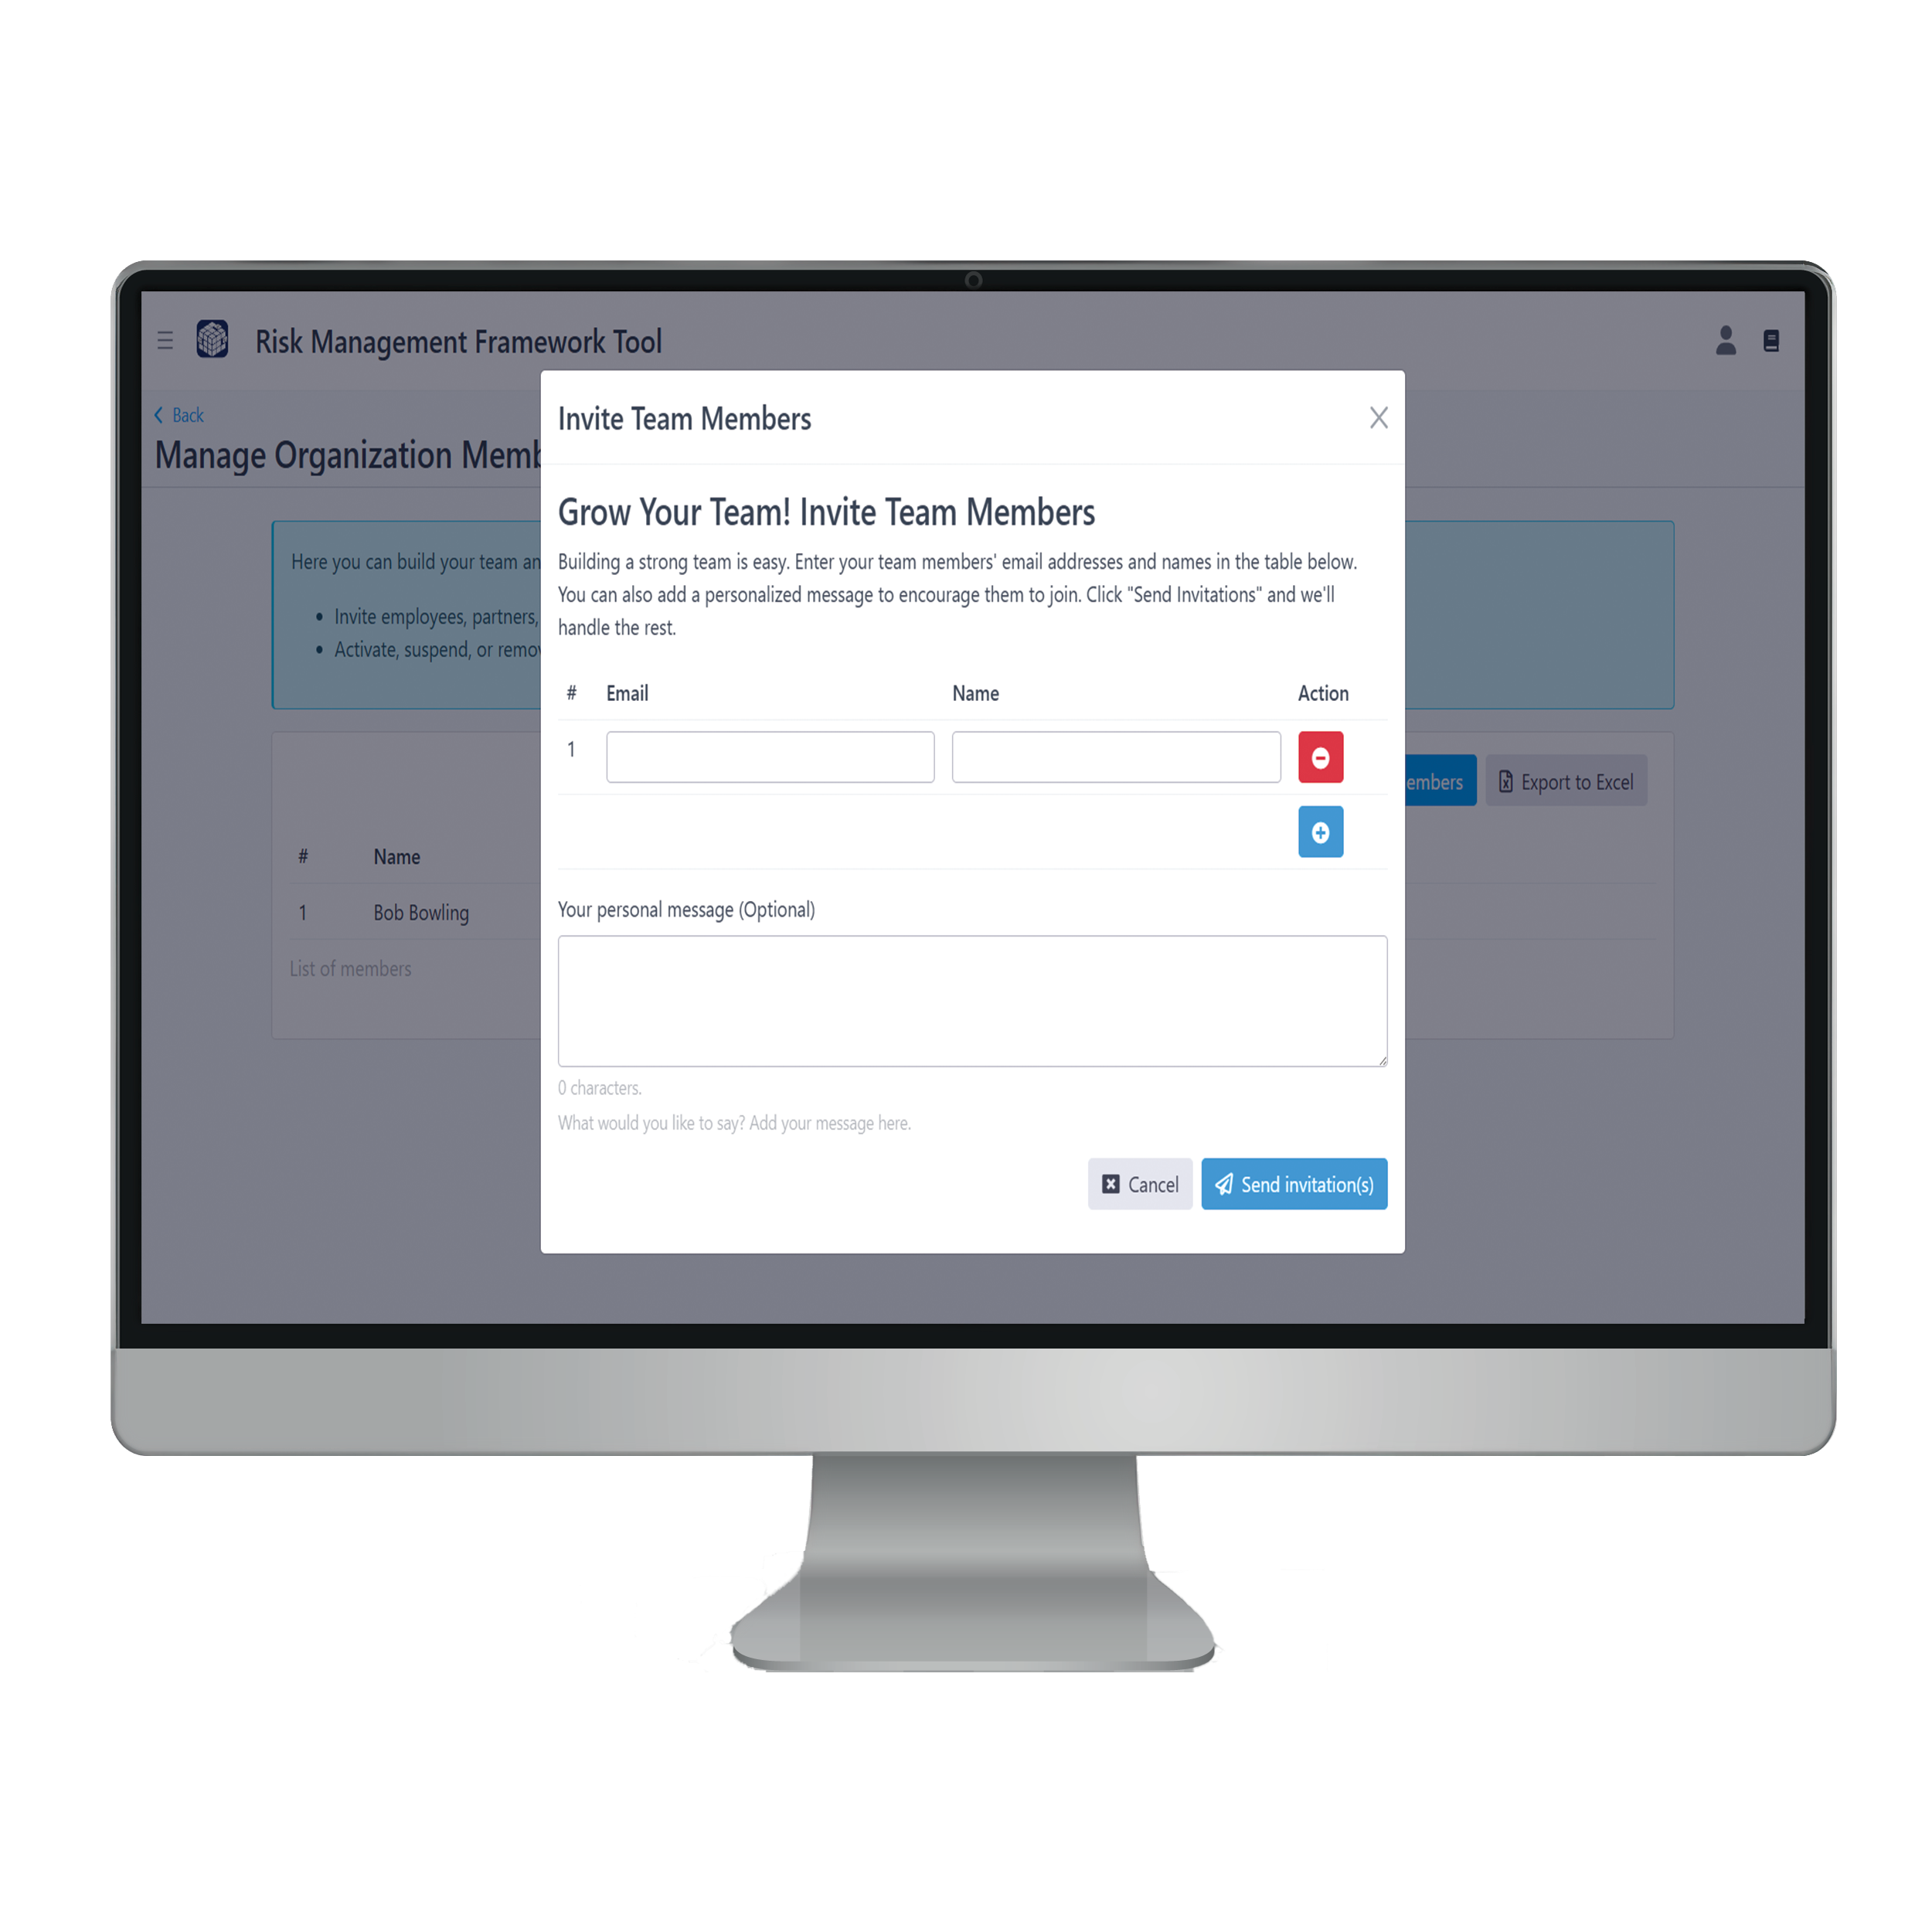
To invite team members, go to either “Manage Organization Members” on the organization dashboard or “Step 1: Project Team” within the project dashboard. Click the blue “Invite Team Members” button, then enter the person’s name, email address, and an optional message. Click “Send Invitation” to email them a link to log in and join the platform.
Once invited, you can assign roles by clicking “Assign Role” in the “List Members by Name” section. Alternatively, you can assign roles by email address using the “Grant Member” option in the “List Members by Role” section. If you’re an administrator, you can assign yourself a role according to your credentials.
5. Tracking Questionnaire Progress
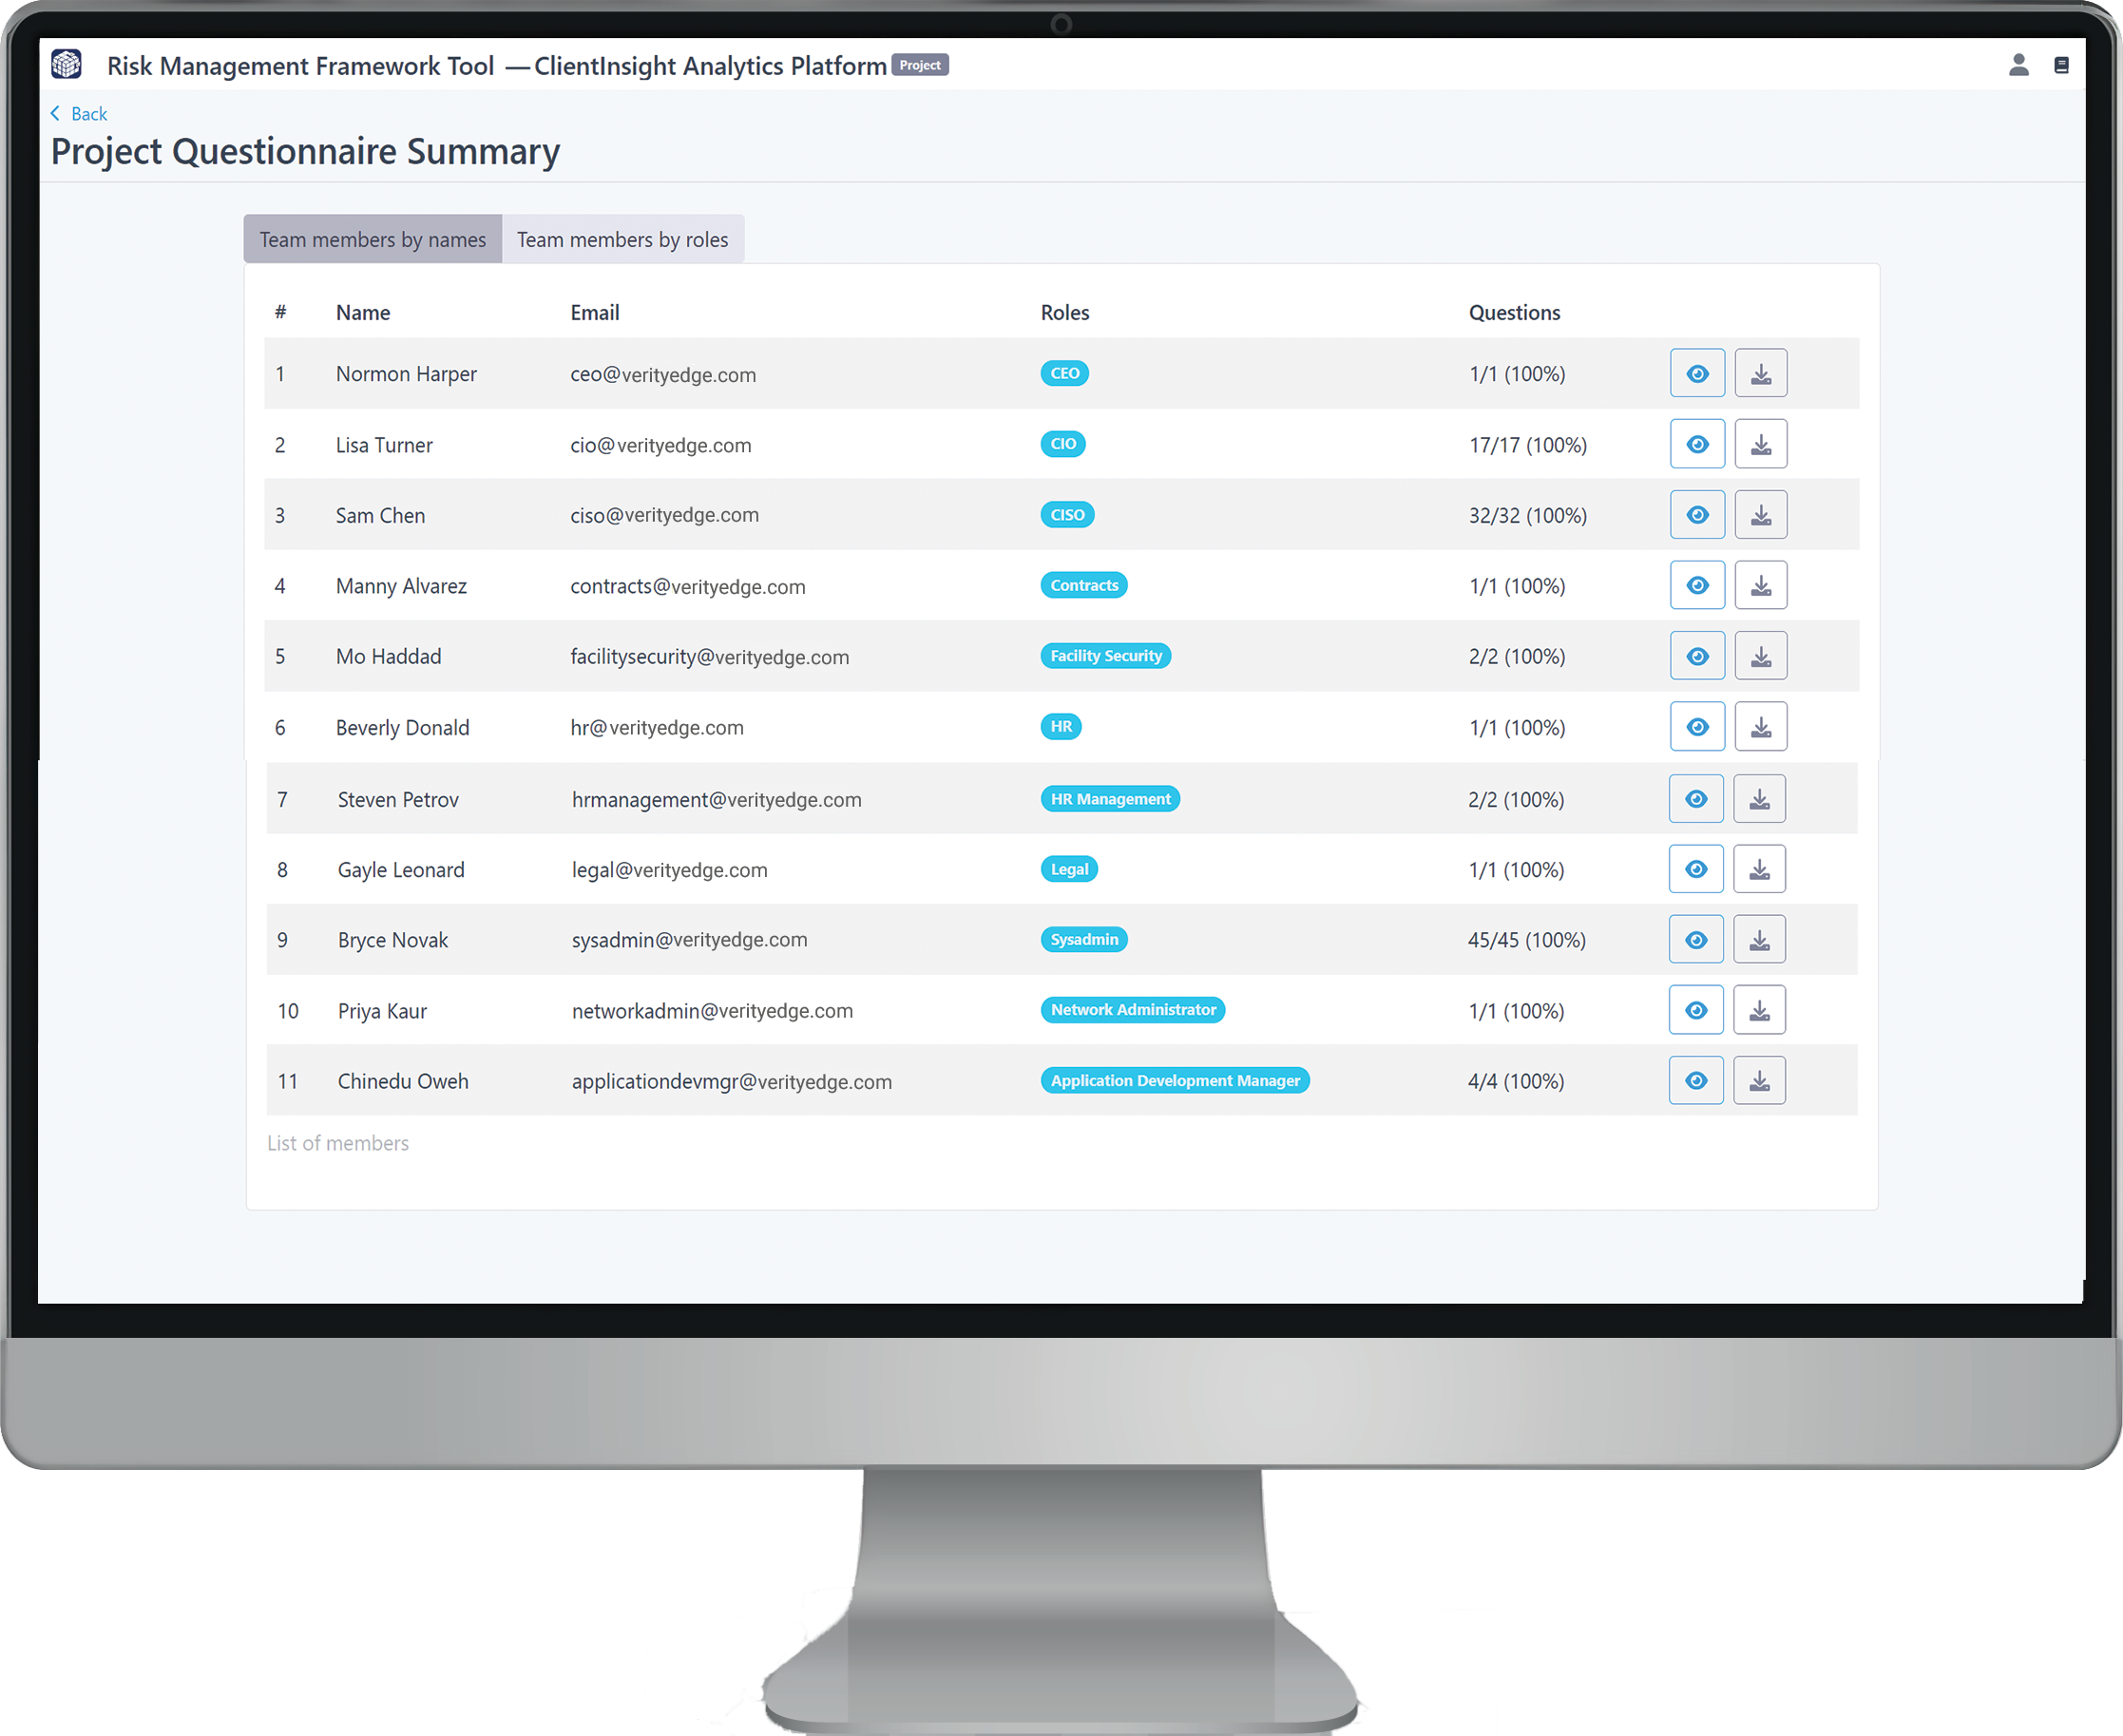
After team members are invited and roles are assigned, users will be prompted to complete an interactive questionnaire related to the organization’s security posture, tailored to their assigned roles.
As the administrator, you can track their progress in the Project Dashboard under “Step 2: Track Questionnaire Progress”. This section allows you to view submitted responses and export them as a PDF for your records.
If you’ve been assigned an additional role beyond your administrator responsibilities, you can complete your corresponding interactive questionnaire by going to the Organization Dashboard and selecting “Go to my project dashboard” in the blue section at the top left under “My Account.” Then, click “Open Questionnaire” to answer the questions specific to your assigned role. To return to the administrative dashboard, select “Switch to Admin View” in the top right.
6. System Categorization
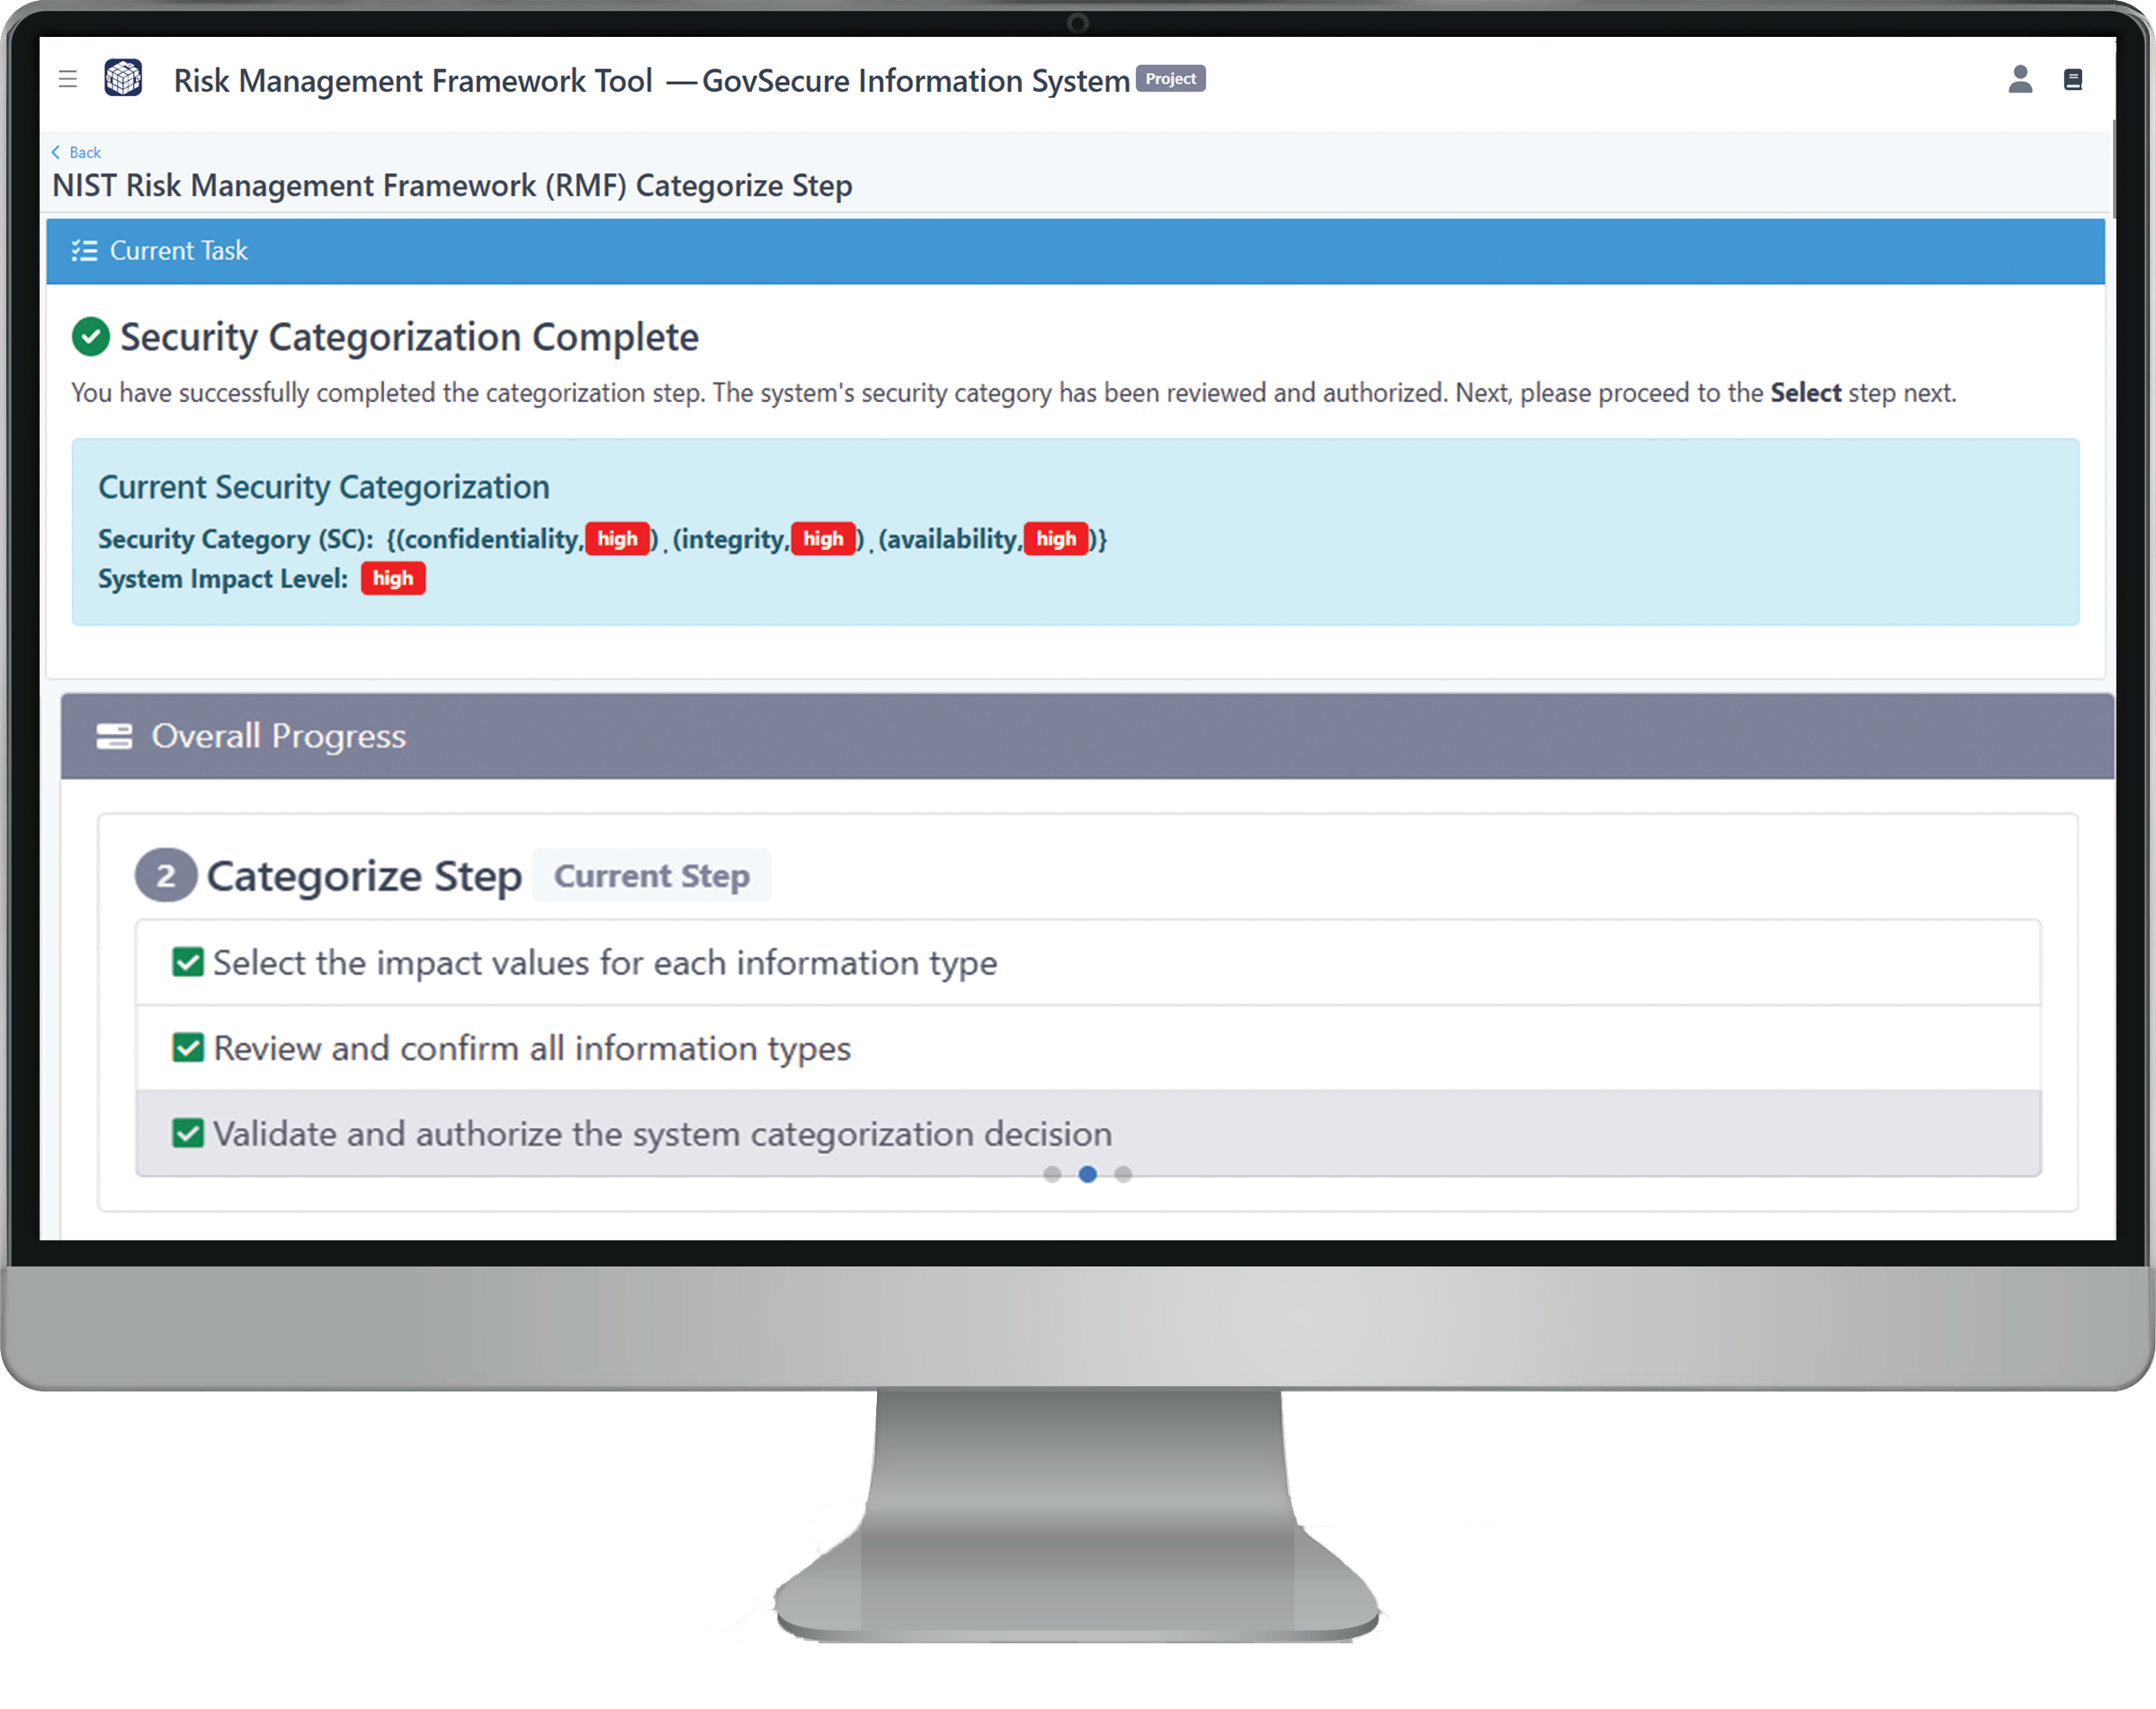
As answers to the interactive questionnaire are submitted, you can transition to the next phase: Step 3 – Security Categorization. Based on the responses, the system automatically generates information types, referred to as containers and capabilities, using Cloud Security Alliance (CSA) Enterprise Architecture (EA) principles.
These information types represent critical components of your system—such as applications, services, or roles—and are the basis for assigning appropriate security impact levels.
When you first enter this step, you'll see the System Breakdown table. This table provides a detailed view of how your system’s containers and capabilities map to:
-
NIST Cybersecurity Framework (CSF) categories and subcategories
-
NIST SP 800-53 Rev. 5 controls, grouped by impact level
-
Additional suggested controls and FedRAMP requirements
-
The container or capability associated with each CSF subcategory
This helps you understand how different parts of your system align with cybersecurity requirements and what level of protection is expected based on the sensitivity of each component.
To assign security impact levels, click the yellow “Task: Edit Impact Level” button next to each information type. In the editing panel, assign values for the three core security objectives:
-
Confidentiality – How important it is to protect the data from unauthorized access
-
Integrity – How critical it is to ensure the data remains accurate and unaltered
-
Availability – How essential it is for the data to be accessible when needed
Select Low, Moderate, or High for each objective based on the potential impact to your organization. The table updates automatically to reflect applicable control sets, ensuring your system is categorized in a way that’s risk-informed, accurate, and compliant with NIST and FedRAMP standards.
Once all impact levels are assigned, move to the Review & Confirm section. Here, you’ll validate the final categorization for each information type. You’ll need to provide a brief comment or justification for each selection to ensure the decisions are properly documented for audits and future assessments.
After confirming all impact levels and justifications, click “Validate and Authorize System Security Categorization” to finalize the categorization phase. This locks your selections and prepares the system for the next step: Security Control Selection.
7. Control Selection and Tailoring
After completing system categorization, proceed to Step 4 – Select Security Controls. Start by clicking the blue “Select Framework (NIST or FedRAMP)” button at the top left of the screen. This defines the baseline security standard used to generate the initial set of controls tailored to your system’s impact levels.
Next, go to the System Breakdown table and click the blue “Task: Identify Controls” button beside each information type. This opens a list of pre-selected controls based on the categorization results.
For each control, you must:
-
Classify the control as common, system-specific, or hybrid
-
Provide a justification for the classification to ensure accountability and traceability
If you need to update a classification, click the “Select” button in the Action column next to that control. Once all controls for the selected information type are classified, click “Back to Risk Management Framework (RMF) Select Step” and repeat the process for any remaining information types.
When all applicable controls are classified, click “Confirm Classification & Proceed” to move on to the tailoring stage.
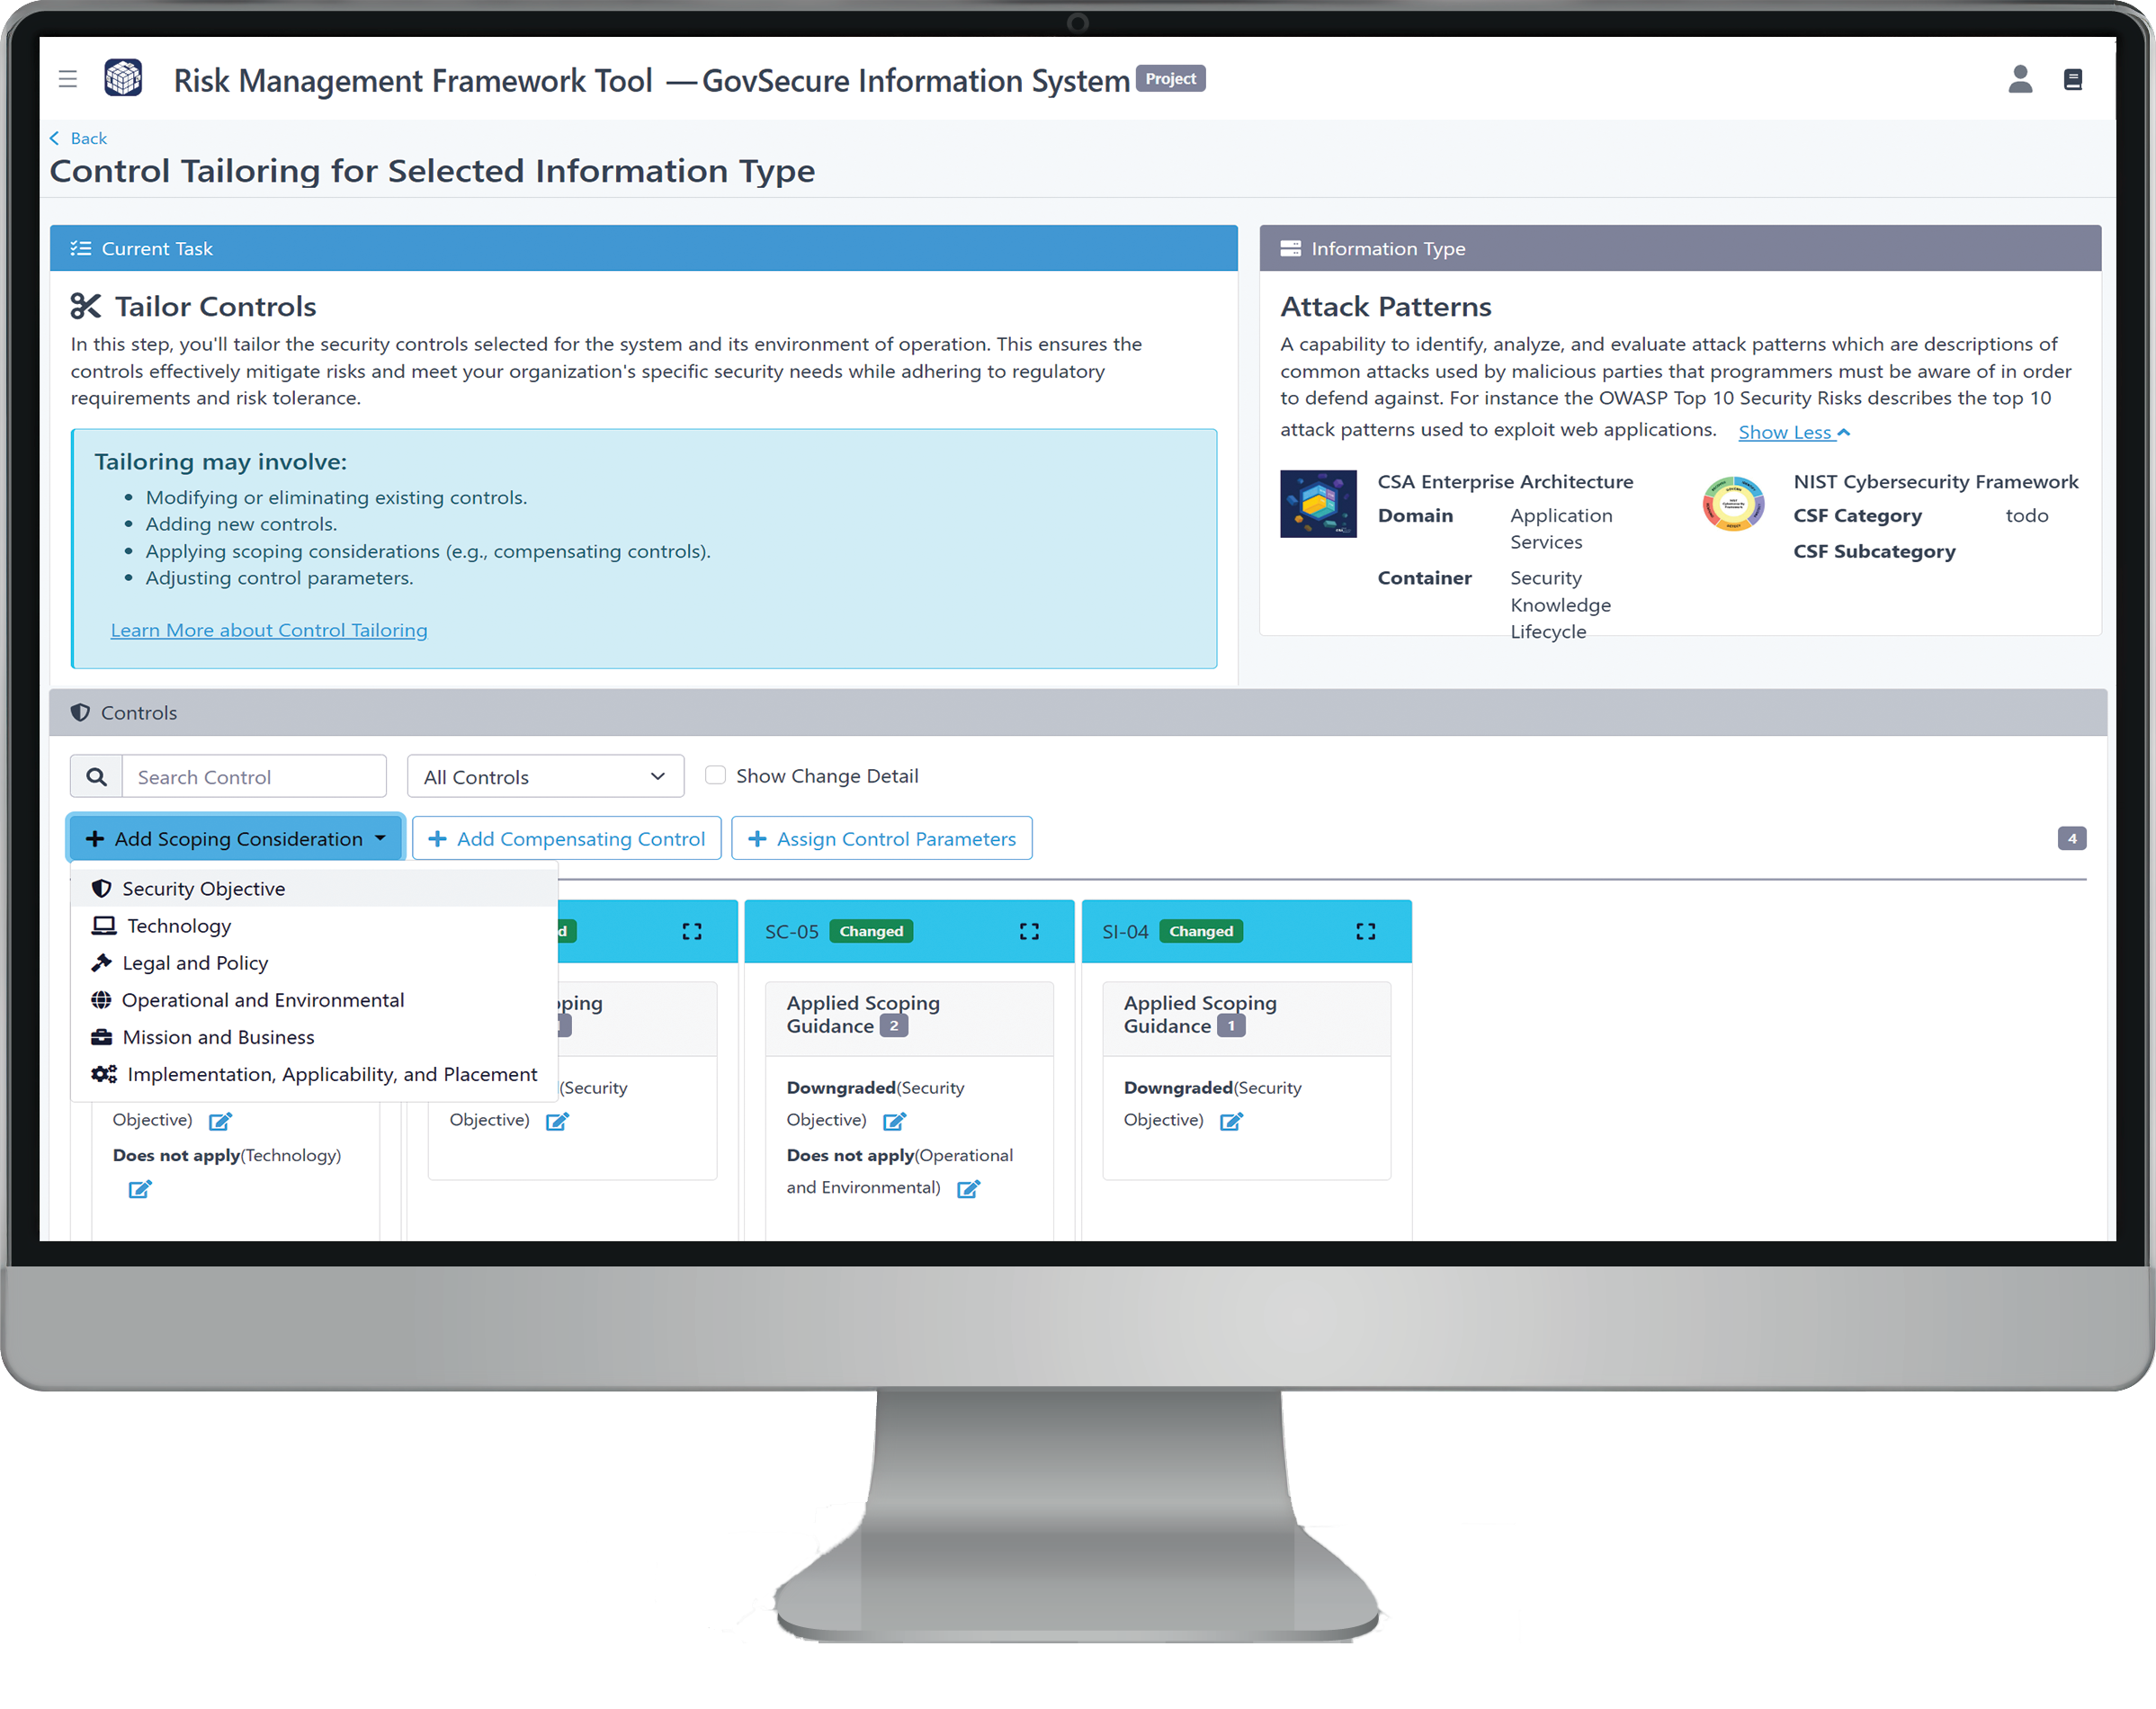
Control Tailoring
Click the blue “Task: Tailor Controls” button in the System Breakdown table for each information type to begin tailoring. This step allows you to customize how each selected control applies based on your system’s risk posture, technical feasibility, and operational environment.
Within the tailoring interface, you can:
-
Apply scoping considerations to determine if a control is fully, partially, or not applicable
-
Assign control parameters for controls that require system-specific input
-
Document compensating controls when standard implementations cannot be met
These tailoring actions contribute directly to the system’s Target Profile, Preliminary Current Profile, and ultimately the System Security Plan (SSP).
Scoping Considerations
Scoping helps determine whether a control is applicable to your system based on real-world constraints. You can adjust a control’s applicability or its associated Confidentiality, Integrity, or Availability (CIA) objectives. Justifications are required for all such decisions.
Supported scoping categories include:
-
Security Objectives - Tailor based on which CIA objectives are relevant
-
Technology Constraints - Note platform or system limitations.
-
Legal & Policy Requirements - Account for mandates, exemptions, or regulatory constraints.
-
Operational & Environmental Factors - Consider staffing, locations, or physical limitations
-
Mission & Business Needs - Evaluate alignment with the system’s purpose
-
Implementation, Applicability, and Placement - Describe how and where the control is (or isn’t) implemented
Control Parameter Assignment
Some controls include variable parameters that must be specified to reflect your system’s implementation. RMF Tool identifies these fields and provides guided input for entries such as:
-
frequency of audits or reviews
-
Specific events to log or monitor events to log or monitor
-
Roles and responsibilities
-
Data retention periods or thresholds
These definitions ensure tailored compliance and consistent application across documentation.
Compensating Controls
When a baseline control cannot be implemented as required—due to technical, operational, or business limitations—you can define a compensating control that provides equivalent or comparable protection.
In the RMF Tool, you can:
-
Indicate that a compensating control is in use
-
Describe the alternate security mechanism or safeguard
-
Justify how it meets the original control’s intent
-
Reference supporting evidence or documentation
Compensating controls are automatically tracked and included in your SSP, with clear labeling for auditors and stakeholders. They’re especially critical for FedRAMP and NIST RMF documentation where deviations from baseline controls must be formally justified.
Once all tailoring actions — including scoping, parameter assignments, and compensating controls — are complete,
click “Confirm Tailoring” for each information type.
These decisions are stored, traceable, and feed directly into the profiles and SSP for export and review.
8. Documentation & Reporting
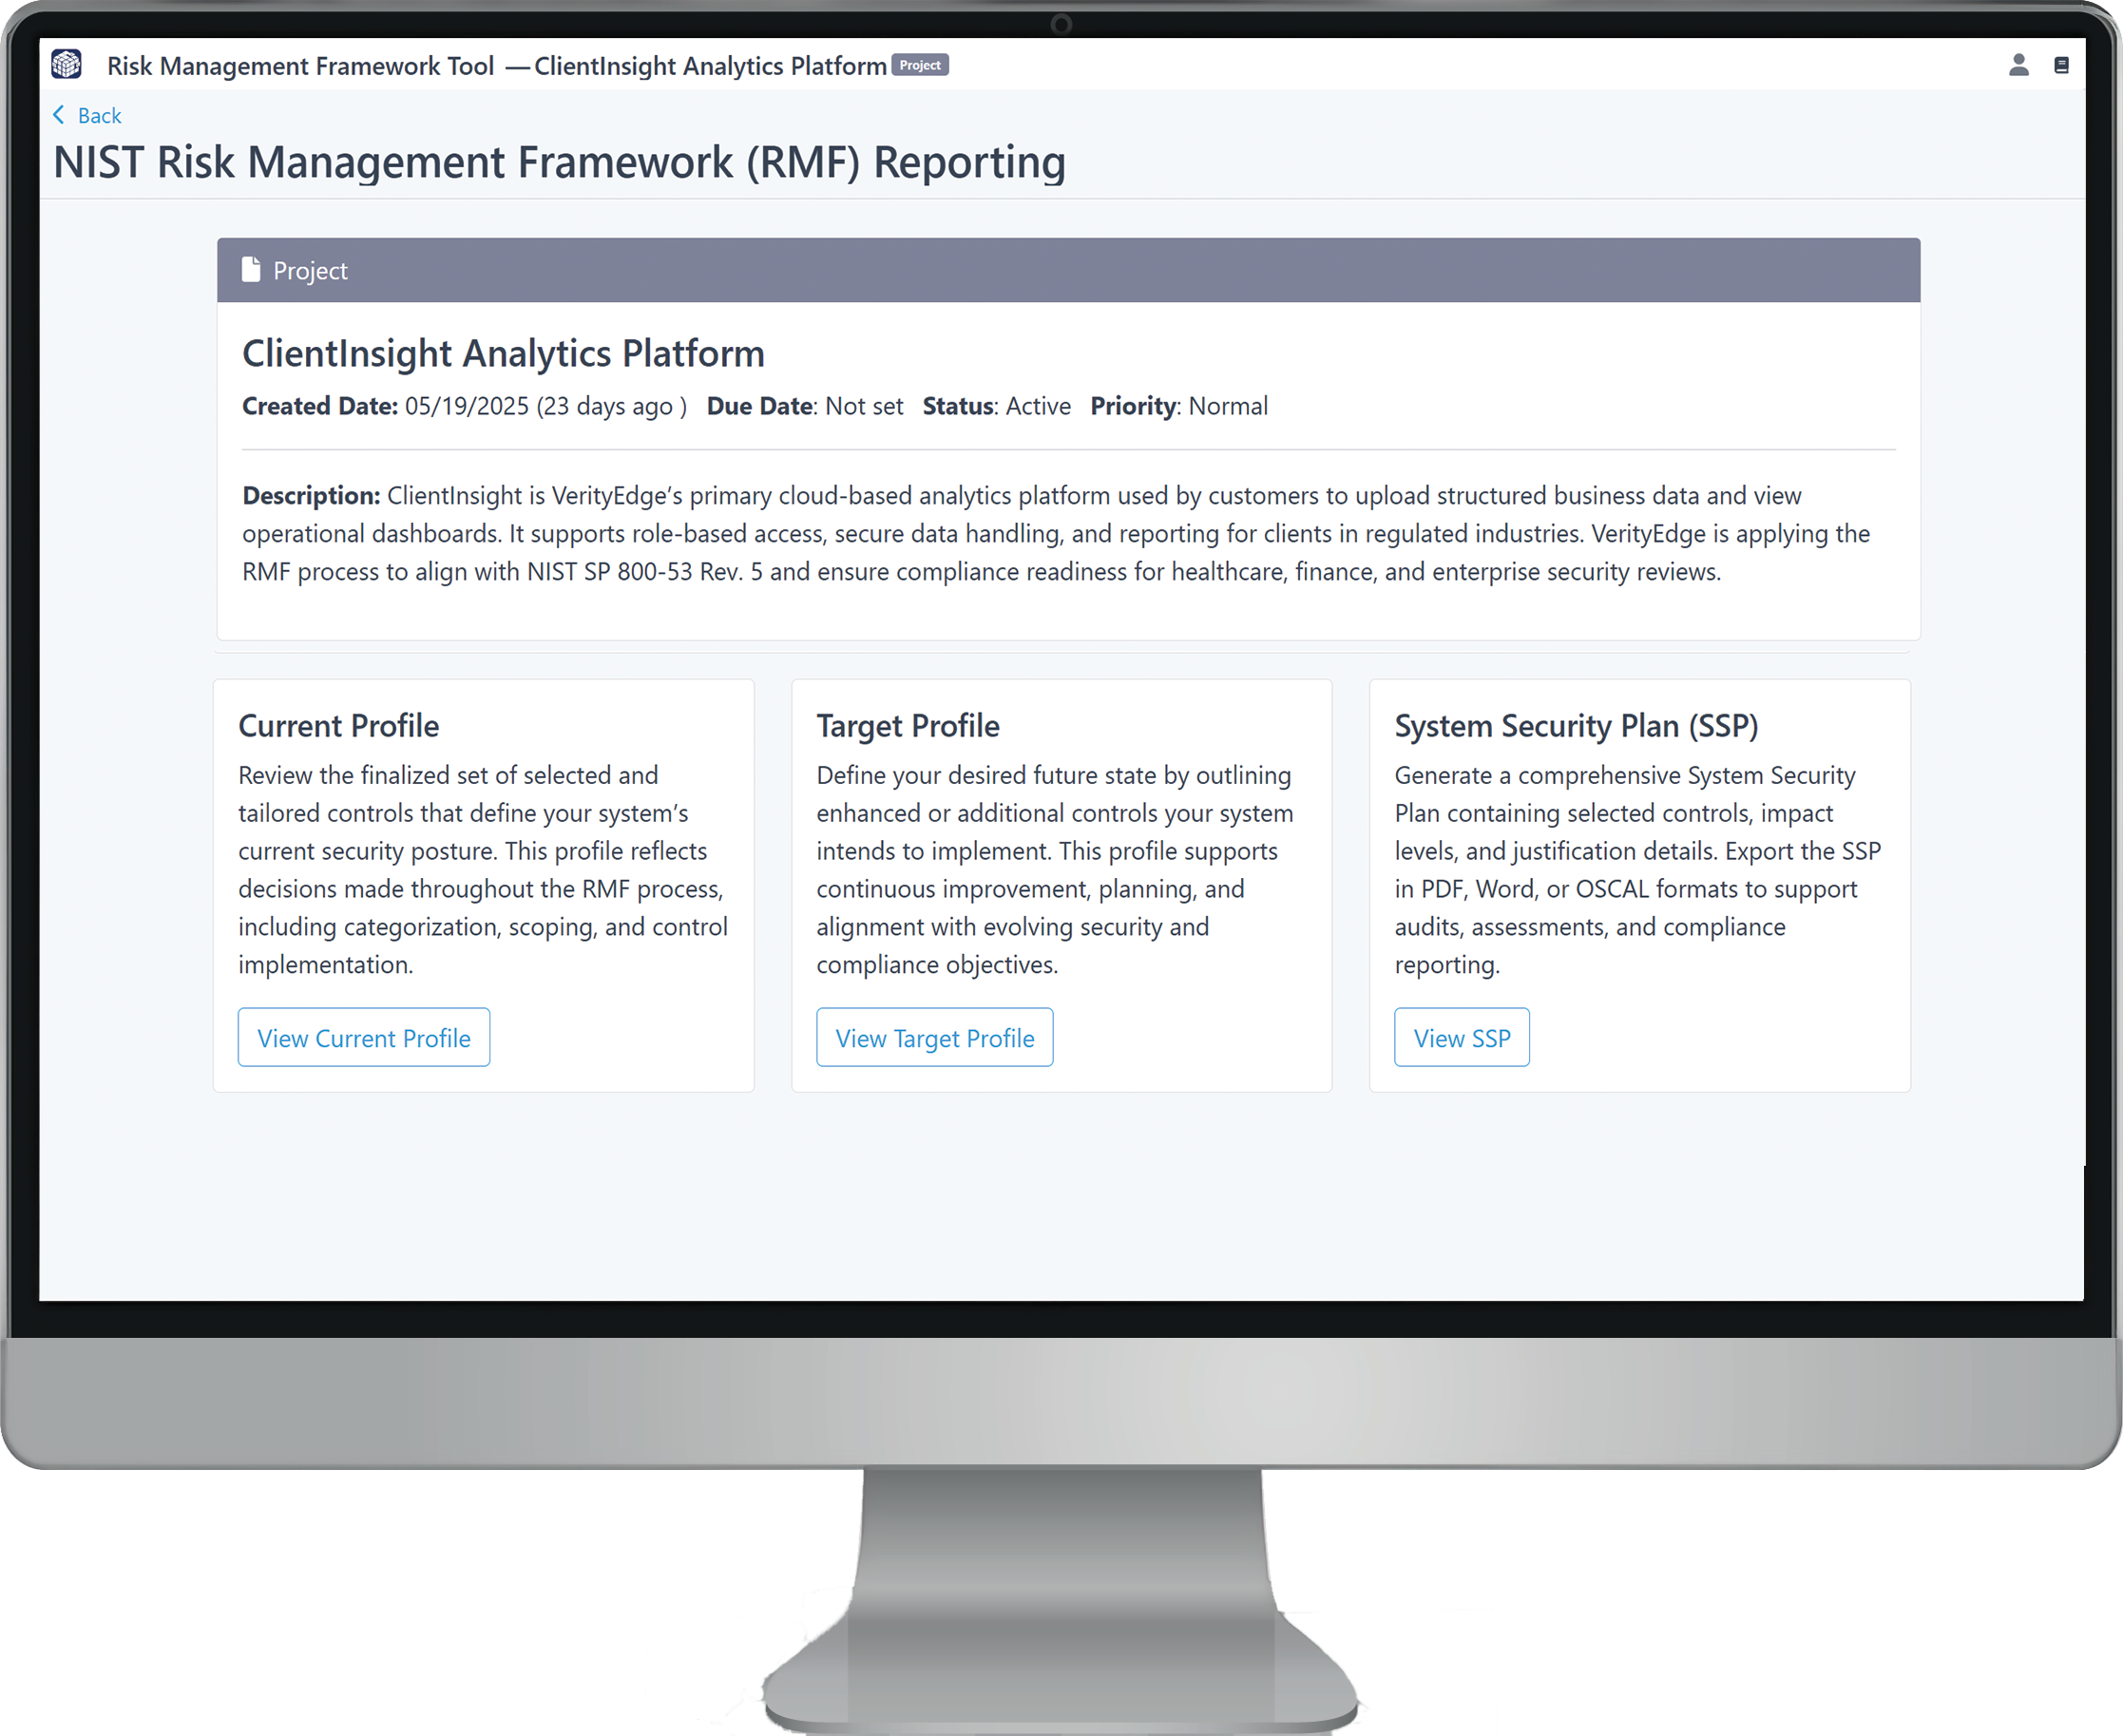
After completing control tailoring, RMF Tool compiles all profile data, control decisions, and compliance context into structured documentation to support audits, internal reviews, and continuous compliance. From the Project Dashboard, the Documentation & Reporting section provides access to the following key components:
Target Profile
Defines your system’s intended control posture based on selected baselines, control classifications, tailoring justifications, parameters, and compensating controls. It enables organizations to identify control gaps by comparing planned implementation against current status—supporting early gap analysis, prioritization, and resourcing. Export formats include Word, Excel, and OSCAL.
Preliminary Current Profile
Reflects your system’s known or in-progress implementations, providing visibility into what’s already in place. This profile helps teams track progress, prepare for assessment activities, and evolve the documentation over time as controls are implemented or refined. Exportable in Word, Excel, or OSCAL.
System Security Plan (SSP)
The SSP consolidates your control tailoring, system categorization, and profile data into a formal, audit-ready document. Exported in Word or Excel, it serves as a core compliance artifact for internal teams and external stakeholders. When exported in OSCAL, it provides a structured, standards-aligned format that reflects your Select-phase planning and early implementation status. The OSCAL SSP also includes a preliminary POA&M (Plan of Action & Milestones) based on control gaps, offering a clear path toward full compliance.
Each section features a search and filter tool for locating controls by ID (e.g., AC-02, SC-28) across profiles and the SSP. Once finalized, your documentation is ready for submission, collaboration, or integration into your organization’s continuous RMF workflow.